Missing up to identifying plants – all of this can be done with Google Lens. Taking the time to learn how Google Lens works with the next iPhone or iPad will be worthwhile, as this image recognition tool can make life a lot easier. Since its launch in 2017, Google Lens has become one of our favorite AI-powered technology tools. Using your smartphone camera and deep machine learning, Google Lens can translate texts affected by plant inflammation and solve equations – cool, right? One of the best Android games out there, Google Lens is now available on iOS devices and is incredibly easy to set up. Whether you own the best iPad or iPhone, Google Lens will work great for you.The additional features mentioned above, Google Lens is great when you are in a store. If you see a pair of shoes that you like, Google Lens will identify them and suggest similar products. It will also link you to the review where the products are available, so you have all the information at your fingertips before deciding whether to purchase.
Google Lens is a real savior on your journey. You can use it to find buildings and attractions, pull up routes in seconds, and see opening hours, so you don’t waste time. It can also detect restaurants and cafes, allowing you to see reviews from the other side of the street before entering.
We know you’re excited about using Google Lens, so we’ve put together everything you need to know about installing and using this powerful tool. Here’s how to install Google Lens on your iPhone or iPad:Google Lens does not have its own app in the App Store, but its functionality is integrated into two different Google apps. The choice between these two apps depends on how you plan to use Google Lens and what results you expect.
The first option is to access Google Lens through the Google app on your iPhone or iPad. This gives you access to a wide range of Google services, such as personalized news, sports updates, and weather information. It also provides access to all the features of the Google search engine, including Google Lens.
To use Google Lens, simply open the Google app and navigate to the camera icon. You can then use the real-time camera function on your iPhone (but not on the iPad) to search for images in your surroundings or search for images that you have already saved in your photo library. To start using Google Lens, download the latest version of the Google app from the App Store.In addition, you can use the Google Photos app, which is a great choice if you plan on using an iPad. This app is Google’s cloud-based photo backup service that offers a range of features for managing and organizing your photos online.
One of the features that sets Google Photos apart from other similar apps is Google Lens. With Google Lens, you can take a photo from your camera roll in the app and use a variety of features to analyze and search for information about the image.
While Google Photos doesn’t allow real-time searching with the iPhone or iPad camera, it does offer other useful features like the ability to upload photos to the cloud and organize them by date, location, or tag. If you’re comfortable with that, you can download the latest version of the app from the App Store and start using it right away.
Both apps will ask for permission to access your photo library when you first open them. If you agree, they will also recommend using the Google Lens feature to take photos and analyze them.
Keep in mind that some features may require you to complete a pre-processing step before they can be used.How to Use Google Lens for Real-Time Search on Your iPhone
If you want to use Google Lens to search for information in real time on your iPhone, open the Google app. On the home screen of the app, find the camera icon in the main menu (unfortunately, this feature is not available on the iPad version of the app). Before using Google Lens, you may need to grant permission for the app to access your photos. You will also see a notification explaining that Google Lens will show permanently enabled features when it is opened.
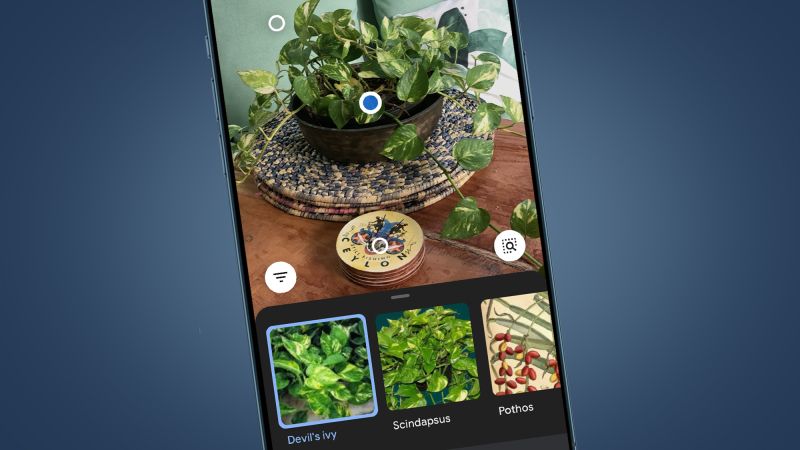
Once Google Lens is open, look to the left and right of the screen to switch between different modes. Each mode has a label that explains what it does. For example, “Translate” allows you to translate text from one language into another. “Text” lets you take a picture of written text that can then be read in a different app. “Dining” allows you to take photos of food to identify and provide recipes.Once you have selected the appropriate mode, simply point your camera at the object you want to identify using Google Lens. When Google analyzes a live image, white circles will appear.
When the camera identifies an object in the frame, a large white circle will appear above it. If there are multiple objects in the frame, each one will be indicated with a white circle. To choose an object to search for, simply move the camera until the desired circle is highlighted in blue. A message will appear asking you to press the shutter button to start the search.
After selecting a suspicious object, click on it to communicate with your server and receive a list of matching results based on the detected item and mode you selected. Note that for this process, you will need an active Wi-Fi or internet connection.The captured image also applies to the monitor. If the object you have selected falls into different categories – for example, text, translation, or homework – you can switch the search mode for this object by paying attention to the white dot on the left with three horizontal lines. The list of results below will be updated without the need for another photo.
Do you want to continue the search with the same image? As above, there is no need to take another photo – just click on one of the white circles in the already captured image to see what Google Lens has identified. Alternatively, if you think Google has missed an object, you can enlarge the white area by increasing the square area. This will help Google by focusing on and reshaping the search area around the specific object you are interested in.
To use Google Lens on photos in your iPhone or iPad’s camera roll, simply follow these steps:Sometimes, you may need to use Google Lens later. For example, you might notice a mysterious plant while you don’t have good data signal or you’re taking photos of your food in a restaurant. However, you don’t want to spend time on your phone if you’re busy at work.
You can easily use Google Lens to search for images saved in your iPhone or iPad camera roll anytime. There are two ways to activate Google Lens. If you have the Google app installed, start by tapping the camera icon next to the search bar on the home screen. When Google Lens is active, tap the image frame next to the shutter button to open your photo gallery. Select any photo, and Google will analyze it.In addition, you can also do the same thing through the Google Photos app. Simply click the Google Lens button located at the bottom of the screen, which is second and appears as a partially framed circle. Once you click on it, Google will analyze the image for any identifiable objects.
Whichever method you choose, the next screen will be identical. Google will present a series of results showing what it has found in your selected image. As mentioned previously, you can change the search mode, location, or frame to focus on a different object using the options on the right side. If Google finds multiple objects in the image, you can easily switch between them by tapping on the white markers indicating each one.
To improve your Google Lens search results on an iPhone or iPad, it is important to ensure that your device is up-to-date with the latest software version. Additionally, you may want to consider adjusting the settings within the Google Photos app to optimize the performance of Google Lens. By following these steps, you should be able to get the most accurate and relevant results from your image searches.For example, Google may have difficulty understanding what it is looking at. Even if Google Lens does recognize an object, the suggested search results can sometimes be the most irrelevant or inaccurate.
If you notice this happening when using Google Lens on your next iPhone or iPad, you can help to improve the tool by leaving a review. At the bottom of the search results page, there is a question: “Do you think these are the best results?” You can then choose “Yes” or “No”. The other option is to provide feedback about your experience, which will help to improve Google’s performance in the future.


МАГИЯ В СМАРТФОНЕ! Все функции Google Lens (Объектив). Как им пользоваться?
В этом ролике я подробно описываю всё, на что способен #Google #Lens (#Объектив), как им пользоваться, а также ...
Discover more from Drone Rewiews
Subscribe to get the latest posts to your email.